UNO vs MICRO vs MEGA 2560โš”

UNO vs MICRO vs MEGA 2560⚔


UNO vs MICRO vs MEGA 2560

Which is the best?๐Ÿค”
The Arduino boards have become one of the most popular microcontrollers on the market with a huge variety of boards. Some Arduino boards are better suited for certain applications. Let’s compare some of the more popular boards that Arduino has created – the Uno, Micro, and Mega 2560 – and see which one is best for your next prototyping, IoT or DIY project, or school robotic project.
Board Size And Price Comparison
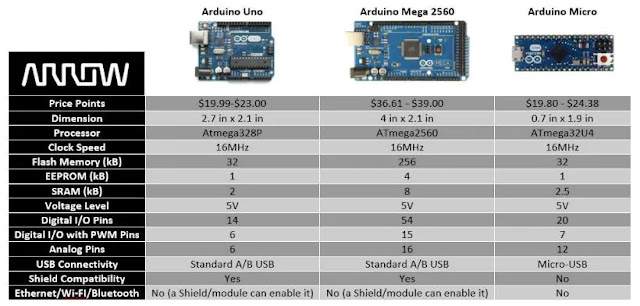
The Micro comes in, being true to its name, at 0.7” x 1.9” making it one of the smallest microcontroller boards out there. On the opposite side of the spectrum, the Arduino Mega 2560 board dimensions are about 4” x 2.1”, making it about 6x bigger than the Micro in terms of area size. Arduino Uno dimensions of 2.7” x 2.1” fall somewhere in between the Micro and the Mega 2560.
The pricing for Micro is usually around $19-25 (can be hard to find stock) while the Uno runs around $20-23, and the Mega 2560 comes in at $36 - $39.


{ ~~the price of Arduino boards is seeing very much expensive, because they are real. They are not clone copy. But the ratio of the difference of price is same~~ }
Connectivity
To get connected to your computer and start coding, both the Uno and the Mega 2560 can easily connect with a Standard A/B USB cable, while the Micro will need a Micro-USB cable.
Each of these Arduinos have a different number of Input/Output pins. The board with the most pins is the Mega 2560, which comes in with a whopping 54 Digital Input/Output pins (were 15 of them have PWM) and has 16 Input Analog pins.
Surprisingly, the Micro has the 2nd most pins out of the three, having 20 Digital Input/Output pins (with 7 of them having PWM) and 12 Input Analog pins.
Coming in last is the Uno, which has 14 Digital Input/Output pins (with 6 of them having PWM) and 6 Input Analog pins.
Also good to note, is that both the Uno and Mega 2560 usually come in as through-hole, while the Micro’s pin layout of its header Input/Output’s allows it to fit into any breadboard or system. This means that most Shields are compatible with the Uno and Mega 2560, but the Micro will be out of luck
Processing Power
All three Arduino boards have their own level of processing power, so let’s talk about their frequency/clock speed. The frequency/clock speed on these boards simply means how fast it can execute commands. It was a nice surprise to see that they all have the same clock speed at 16 MHz.
The Flash memory on the Uno and Micro are the same at 32 kB, while the Mega 2560 has 256 kB, giving it 8x more memory space! The Flash memory simply means how big of a sketch/code you can upload to your Arduino, therefore if you have a hefty code the Mega 2560 is the way to go.
Arduino boards use SRAM (Static Random-Access Memory). The Mega 2560 has the most SRAM space with 8 kB, which is 4x more than the Uno, and 3.2x more than the Micro. With more SRAM space, the Arduino has more space to create and manipulate variables when it runs.
Conclusion
The Arduino comparison table below shows a side-by-side comparison of the Uno, Mega 2560, and Micro. Choose your best….
reference: www.arduino.cc
Raspberry Pi โš” Banana Pi

Raspberry Pi ⚔ Banana Pi


Raspberry Pi  Banana Pi
.............................................
Which is the best?


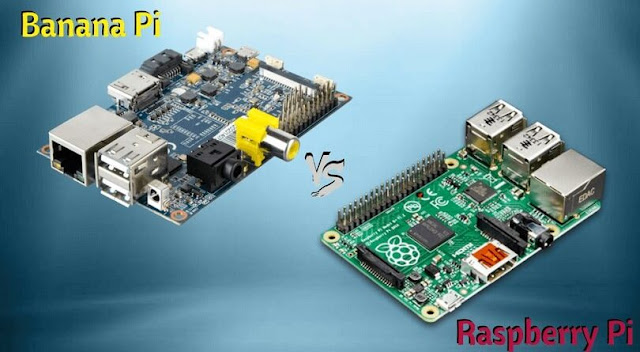
Raspberry Pi is a series of small single board computers, with low cost that can plug into a computer monitor or TV and uses a standard keyboard and mouse.


Banana pi which is a competitor of Raspberry Pi is a new single-board computer that is powered by a much faster processor and RAM. Hardware design of Banana Pi is highly influenced by Raspberry Pi. Thus, Banana Pi is compatible with Raspberry Pi boards. It can also run on various operating systems like Raspbian, NetBSD, Android, Debian etc. It uses Allwinner SoC (System on a chip) and covered by Linux-sunxi port.

Raspberry VS Banana

Raspberry Pi depends on MicroSD and USB for storage whereas Banana pi is fitted with a SATA port, which allows a faster option for connecting mass storage devices like hard drives. ...
Raspberry Pi 3 comes with a quad-core processor with 1 GB RAM whereas Banana pi M3 has an octa-core processor with 2GB RAM.
Raspberry Pi is a capable little device that would enable people from all walks of life to explore computer science and to learn how to program in languages like Python. It is supposed to do everything you would expect from a desktop computer to do, ranging from browsing the internet and playing definition video, making spreadsheets, word processing, and playing games.
Banana Pi is affordable with extensible configurations. Its high performance is driven by Allwinner SoC and 1 GB DDR3 SDRAM. It is highly versatile and compatible with Raspberry pi image. It is for everyone who wants to play and create with computer technologies, instead of simply being a user of electronics.
Raspberry Pi has a small size and accessible price; thus, it was quickly adopted by computer enthusiasts for a project which requires more than a basic microcontroller.
Banana pi provides an open source hardware platform which was produced to run Elastos.org open source operating system. It is dual core, Android 4.2 product which is better than Raspberry Pi. It is highly efficient with several Linux distributions in the market like Debian, Ubuntu, OpenSuse and images that run on Raspberry Pi and Cubieboard. It consists of a Gigabit Ethernet port and a SATA socket.
The size of Banana pi M1 is about the same size as a credit card. It has a potential to run the games smoothly as it supports 1080P high definition video output. The GPIO is compatible with Raspberry Pi and it can run Raspberry pi images directly.
Now just choose yours pi....
 Artificial Intelligence VS Internet of Things

Artificial Intelligence VS Internet of Things

 Artificial Intelligence VS Internet of Things


Hello Friends. Which is the best? AI or IOT ........


What is AI ?

It is all about stimulating intelligence in machines. Artificial intelligence is derived at after stipulative thorough data analysis after serious consideration on derivations and results. AI is beneficial for real-time analysis, post or pre-event processing also. With a strong database, the AI can increase the accuracy of predictions and act accordingly with respect to the commands input by the external stimulus.
Artificial Intelligence is a way of machine learning in fact, which thoroughly examines the pattern and derive on results effectively.AI is a result of collective predictive analysis, continuous analytics and prescriptive analytics. It is just mimicking human intelligence. Most of the current applications, or devices are completely dependent on the AI, as it gives a better interactive environment which is impelling.

What is IoT?

IoT forms an ecosystem of connected devices in a wireless manner which is accessible via the internet.
The connected devices have sensors and have inbuilt embedded systems which can message to the other interconnected devices. The communication of these devices is made possible through effective intelligent technology.
With Iot finding its application in a wide variety of ways like making smart homes, wearable devices, smart cities and even smart vehicles, IoT is expanding day-by-day.

Difference Between Artificial Intelligence and IoT

Aspects

Artificial Intelligence

Internet of Things

Cloud Computing

 Highly Strong – As it facilitates the machine to think, enact and learn from the human instances created.
Both are complimentary in efficiency while Cloud gives a pathway to manage data.
Procuring through the data obtained.


Ai is all about data, it learns and rectifies its performance from errors encountered and evolve in a genuine way. It supports decision making.

In IoT it is mostly captured moments from sensors that bring in data and are stored inside and whenever required the data is pulled in.
Cost
Price is mostly calculated based on each requirement.
Price is substantially lesser.

Scalability
Less Scalable

Scalable being cloud based.

System

AI is all about system behaviour

IoT is inbuilt in a system.

Data

AI needs lot of data, like patterns and understanding the behaviours.
Iot is all about sensors.

Objects
AI does not specifically require objects; it is the system itself.
IoT is mostly concerned about the objects which are embedded with the technology that can capture sensory movements as well as other patterns.

Algorithm

AI is based on deep learning algorithms which are obtained from various sources to design the behaviour of the system.
IoT is all about sensory data that is used to creating an algorithm to formulate the system behaviour.
Behaviour


AI is all about instinctive reactions with respect to the input received.

IoT is a set of predefined responses, that are triggered using the devices and are predefined using specific codes based on algorithms.
Online /Offline


AI is mostly related to online features and responses

IoT is designed in a way, even to work without Internet.
Human Interventions

AI is all about human intrusion.it is either human-human or human-computer
IoT is about transferring data without or with human intervention. It is nothing about human-to-human or computer interaction as it has UIDs (Unique Identifiers).
Artificial Intelligence is all about making your system behave smartly according to human behavior, whereas IoT is all about the sensors of devices. Even though differences are stated, Artificial Intelligence and the Internet of Things do have a clear intersection between them, which is why AI becomes the lead to the future of IoT. Together they bring in a connected level of intelligence which will make computers smarter and not just devices that are interconnected.
How To Make Arduino Tone Player?

How To Make Arduino Tone Player?

Arduino Tone Player

Hello friends, how are you ? Today in this tutorial we are going to make "Arduino Tone Player".

Arduino is an excellent way to simplify and speed up your microcontroller projects, thanks to its community of developers who have made almost everything look simple. There are lots of Arduino projects out here for you to try and have fun. Some of your projects might need some sounds action to notify about something or just to impress the viewers. What if I told you that almost any theme songs that could be played on a piano can be mimicked on your Arduino with the help of a simple program and a cheap Piezo speaker?
In this tutorial we will learn how simple and easy it is to Play Melody on Piezo Buzzer or Speaker using the Arduino tone () function. At the end of this tutorial you will be able to play some famous tones of Harry Potter theme song, Despacito etc. Check the Video at the end.

  Required Components:

  1. Arduino (any version – UNO is used here)
  2. Piezo Speaker/Buzzer or any other 8ohm speaker.
  3. Breadboard
  4. Connecting Wires
  5. 100 ohm resistor

  Circuit Diagram:


  Software Part:

Here I am going to play Harry Potter theme song. At first, you have to download the MIDI version of the song which you want to play with Arduino Tone Player. It is very easy, just search in google like this " harry potter theme song MIDI download ". There are many websites which are providing these without money. so just download the MIDI file.You can also download your favourite MIDI file from hereThey have a good collection. Then we have to convert the MIDI file to arduino code. For this open this website.


It will look like this-


Click on "Choose File"-


Select the MIDI file-


Then scroll down and click on "Submit"-


Then it will look like this-


Now copy the whole code. Open Arduino IDE. And then paste the code-


First change the tone pin 4 to 8 as we use digital pin 8. Now you can change the Tempo value  And the Melody value. But before this read the comment highlighted on the image.
Now upload your code to Arduino. And your Arduino Tone Player is now ready.


You can get the complete tutorial in this video. 


Despacito cover with Arduino Tone Player


Thanks friends. Have a nice day.


Face Tracking Using Arduino

Face Tracking Using Arduino


Face Tracking Using Arduino


 In this tutorial, I will be showing you how to track faces using Arduino and Python and make the camera follow the face. This may sound difficult but trust me it isn't, All you need is basic knowledge of Arduino and Python.
So let's get started...
Step 1: Things You Will Need
 The requirements are minimum. Here I have provided part list of everything you need:
Hardware Requirements:
·         Arduino UNO (You can use other boards )
·         Web Cam ( Mini Web Cam)
·         Servos x 2 (I'll be using micro servos but you can use Standard Servos)
·         Breadboard (For prototyping)
·         Servo Pan Tilt Kit (You can build one if you want)
Software Requirements:
·         Python 2.7 (Should be installed, Linux OS usually have it pre-installed)
·         OpenCV (You can download it separately or install using 'pip install' Explained further)
·         pyserial (Can be installed with pip)
·         numpy.
·         Haarcascade.
After every thing is gathered we can move on to the Installation Step...
Step 2: Setting Up Python Environment
Installing Python:
 So first we need Python 2.7 up and running. To do this first download and Install python 2.7.14. To check if it is installed correctly Goto : Windows Search >> Type "IDLE" >> Hit Enter. A Python Shell should pop up.
OR
In search type 'CMD' and hit enter to open Command Prompt. In CMD type >> python and hit enter, Python interface should display.
If you see an error in CMD, Do not panic you probably need to set environment variable. You can follow this tutorial Here to set up Environment Variable.
Installing 'pyserial', 'OpenCV" and "numpy" in Python:
To install these modules we will use use pip install,                    
First open CMD and type the following codes:-

>pip install serial
>pip install opencv-python
>pip install numpy

these commands will install the necessary modules. Now we can move to the coding part...
Step 3: Python Script


Before starting to write code first thing to do is make a new folder as all of the code needs to be stored in same folder. So create a new folder, name it anything you want. and download the 'Haarcascade' from below and paste it in the folder.
Now open notepad and write the script given below, Save it as 'face.py' in the same folder as haarcascade. (You can download the code I have provided the file below) :

#import all the required modules
import numpy as np
import serial
import time
import sys
import cv2
#Setup Communication path for arduino (In place of 'COM5' put the port to which your arduino is connected)
arduino = serial.Serial('COM5', 9600)
time.sleep(2)
print("Connected to arduino...")
#importing the Haarcascade for face detection
face_cascade = cv2.CascadeClassifier('haarcascade_frontalface_default.xml')
#To capture the video stream from webcam.
cap = cv2.VideoCapture(0)
#Read the captured image, convert it to Gray image and find faces
while 1:
    ret, img = cap.read()
    cv2.resizeWindow('img', 500,500)
    cv2.line(img,(500,250),(0,250),(0,255,0),1)
    cv2.line(img,(250,0),(250,500),(0,255,0),1)
    cv2.circle(img, (250, 250), 5, (255, 255, 255), -1)
    gray  = cv2.cvtColor(img, cv2.COLOR_BGR2GRAY)
    faces = face_cascade.detectMultiScale(gray, 1.3)
#detect the face and make a rectangle around it.
    for (x,y,w,h) in faces:
        cv2.rectangle(img,(x,y),(x+w,y+h),(0,255,0),5)
        roi_gray  = gray[y:y+h, x:x+w]
        roi_color = img[y:y+h, x:x+w]
        arr = {y:y+h, x:x+w}
        print (arr)
       
        print ('X :' +str(x))
        print ('Y :'+str(y))
        print ('x+w :' +str(x+w))
        print ('y+h :' +str(y+h))
# Center of roi (Rectangle)
        xx = int(x+(x+h))/2
        yy = int(y+(y+w))/2
        print (xx)
        print (yy)
        center = (xx,yy)
# sending data to arduino
        print("Center of Rectangle is :", center)
        data = "X{0:d}Y{1:d}Z".format(xx, yy)
        print ("output = '" +data+ "'")
        arduino.write(data)
#Display the stream.
    cv2.imshow('img',img)
#Hit 'Esc' to terminate execution
    k = cv2.waitKey(30) & 0xff
    if k == 27:
       break

Once this is done, move on to write the code for Arduino...

haarcascade_frontalface_default.xml, download from here
face.py, download from here


Step 4: Arduino Code

After the python script is ready we need arduino sketch to control the servo. Refer the code below, paste it in Arduino IDE and save it as 'servo.ino' in the same folder as face.py and haarcascade. upload the code and move on to the next step to make the connections.

(Downloadable file given below.)

#include<servo.h>
Servo servoVer; //Vertical Servo
Servo servoHor; //Horizontal Servo
int x;
int y;
int prevX;
int prevY;
void setup()
{
  Serial.begin(9600);
  servoVer.attach(5); //Attach Vertical Servo to Pin 5
  servoHor.attach(6); //Attach Horizontal Servo to Pin 6
  servoVer.write(90);
  servoHor.write(90);
}
void Pos()
{
  if(prevX != x || prevY != y)
  {
    int servoX = map(x, 600, 0, 70, 179);
    int servoY = map(y, 450, 0, 179, 95);
    servoX = min(servoX, 179);
    servoX = max(servoX, 70);
    servoY = min(servoY, 179);
    servoY = max(servoY, 95);
   
    servoHor.write(servoX);
    servoVer.write(servoY);
  }
}
void loop()
{
  if(Serial.available() > 0)
  {
    if(Serial.read() == 'X')
    {
      x = Serial.parseInt();
      if(Serial.read() == 'Y')
      {
        y = Serial.parseInt();
       Pos();
      }
    }
    while(Serial.available() > 0)
    {
      Serial.read();
    }
  }
}

servo.ino, download from here


Step 5: Pan-Tilt Mechanism :-


I have used a readily available kit for the Pan-Tilt. If you want you can make one yourself using wood/Plastic or even 3D print one.
The one I used is pretty cheap, and very easy to assemble. Yet if you want instructions on how to do that, you can find it here.
Step 6: Making Connections


The Circuit is pretty simple. Just attach two servos to arduino.
·         Vertical to Pin 5
·         Horizontal to Pin 6
·         Power to +5V
·         Ground to GND
Check the circuit diagram for reference.

Step 7: Testing
·         After everything is done last thing to do is test if it works. To test first make sure that servos are properly connected to arduino and sketch is uploaded.
·         After sketch is uploaded make sure to close the IDE so the port is free to connect to python.
·         Now open 'face.py' with Python IDLE and press 'F5' to run the code. It will take a few seconds to connect to arduino and then you should be able to see a window streaming the web cam. Now the code will detect your face and the servos will track it track it.
·         The servo should move as you move the object. Now just attach the camera to the servos so it will move along with servos.
Hope you like it. and learn something new.